使用Cloudflare Pages和Astro做一個縮址服務
AI生成摘要
在這篇文章中,我們將介紹如何使用 Cloudflare Pages 和 Astro 建立一個 URL 縮短服務。本文涵蓋了環境設置、Astro 和 Cloudflare 的整合、Cloudflare KV 的設置以及頁面的實現和部署。通過這些步驟,您將能夠構建一個功能齊全的 URL 縮短服務。
Prerequisite
- Docker
- VSCode
- Cloudflare帳號
建置環境
我使用VSCode dev container
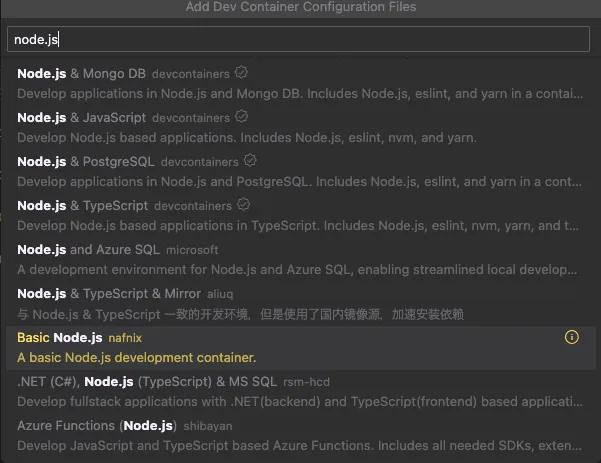
在VSCode裡按下F1
選擇Dev Containers: Add Dev Container Configuration Files...
選擇一個node.js環境:
以下是我使用的devcontainer.json和Dockerfile
{
  "name": "Untitled Node.js project",
  "build": {
    "dockerfile": "Dockerfile"
  },
  "remoteUser": "node",
  "features": {
    "ghcr.io/devcontainers/features/common-utils:2": {}
  },
  "forwardPorts": [
    4321, // for astro dev server
    8976  // for wrangler login
  ],
  "customizations": {
    "vscode": {
      "extensions": [
        "astro-build.astro-vscode",
        "svelte.svelte-vscode",
        "dbaeumer.vscode-eslint",
        "GitHub.copilot",
        "GitHub.copilot-chat"
      ]
    }
  }
}其中forwardPorts是等一下開發時會用到
FROM node:22

# Install basic development tools
RUN apt update && apt install -y less man-db sudo

# Ensure default `node` user has access to `sudo`
ARG USERNAME=node
RUN echo $USERNAME ALL=\(root\) NOPASSWD:ALL > /etc/sudoers.d/$USERNAME \
    && chmod 0440 /etc/sudoers.d/$USERNAME

# Set `DEVCONTAINER` environment variable to help with orientation
ENV DEVCONTAINER=true
有關其他VSCode dev containers也可以參考另一篇設定
設定Astro
進入container中後使用官方的工具生成astro檔案
npm create astro@latest

# dir   Where should we create your new project?
#        ./astro

# tmpl   How would you like to start your new project?
#        A basic, minimal starter

# deps   Install dependencies?
#        Yes

#  git   Initialize a new git repository?
# Yes生成的檔案在/astro資料夾中,我將內容全部移出來
mv astro/* .
rm -rf astro
嘗試啟動dev server,應該可以看到初始畫面
npm run dev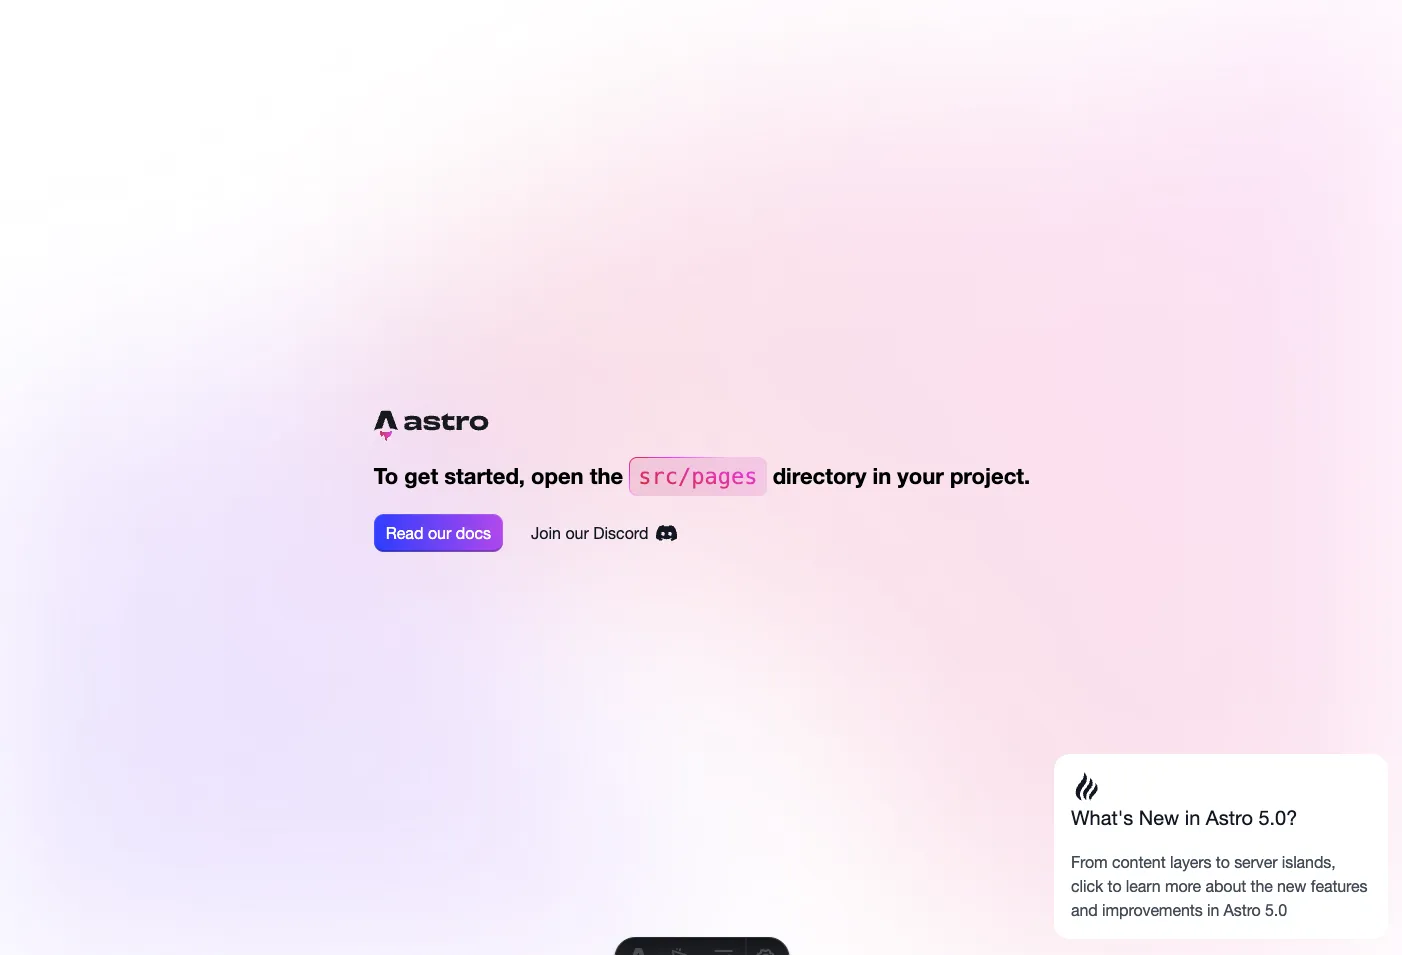
Cloudflare Integration
加上Cloudflare的integration
npx astro add cloudflare他應該會自動幫我們設定檔案,不過我們還需要增加一些設定:
export default defineConfig({
  output: "server",
  adapter: cloudflare({
    platformProxy: {
      enabled: true,
    },
  }),
})我們的縮址服務並不是純靜態網頁,所以設定output: 'server'讓astro變成預設SSR
而platformProxy.enabled是為了讓我們在local也能使用cloudflare功能
有關這部分可以參考官方文件
設定Cloudflare KV
我們的轉址服務最少需要保存short與URL的key-value pair,這裡使用Cloudflare KV
登入wrangler
wrangler是Cloudflare的官方工具,我們先登入
npx wrangler login本來應該會彈出瀏覽器,但在dev container中不會自動彈出來,需要我們手動複製URL貼到瀏覽器

同意後頁面會嘗試跳轉回8976 port,有可能會失敗
但我們之前已經在devcontainer.json開啟這個port了,所以應該可以順利登入
建立KV Namespace
建立一個namespace來保存我們的資料,先取名為SHORT_TO_URL
npx wrangler@latest kv:namespace create SHORT_TO_URL應該會從terminal得到一組id,新增wrangler.toml並貼上內容
[[kv_namespaces]]
binding = "SHORT_TO_URL"
id = "[YOUR ID HERE]"為了待會開發環境能辨識SHORT_TO_URL,新增env.d.ts
/// <reference types="astro/client" />

type KVNamespace = import("@cloudflare/workers-types").KVNamespace;
type ENV = {
  SHORT_TO_URL: KVNamespace;
};

// use a default runtime configuration (advanced mode).
type Runtime = import("@astrojs/cloudflare").Runtime<ENV>;
declare namespace App {
  interface Locals extends Runtime {}
}這部分可參考官方文件
不知不覺多了.wrangler這個資料夾,似乎不需要加入版本控制,在.gitignore中新增:
.wrangler/實裝頁面
我一共有三個endpoints:
src/pages/index.astro- 首頁。static,準備一個form來讓使用者輸入URL和送出
src/pages/shorten.ts- 接收URL並回傳縮短後的slug
src/pages/[slug].ts- 接收slug並redirect到已儲存的URL
src/pages/index.astro
這個頁面基本就是需要可以互動的Form,可以不需要是SSR,我們加入prerender = true來指定
可以參考這裡
---
export const prerender = true;
---
Form部分我使用svelte來實裝
npx astro add sveltecss的部分就省略了,比較需要注意的是在index.astro的部分需要指定這個component為client:load避免無法互動
<Form client:load />Form內容就跟普通前端實裝差不多,可以參考GitHub
src/pages/shorten.ts
這個endpoint是用來接收URL,並返回縮短後的slug
我使用md5加密,所以先安裝package:
npm i -S js-md5計算好slug後就可以從locals中取得先前設定的SHORT_TO_URL
import type { APIRoute } from "astro"
import { md5 } from "js-md5"

const charset = "abcdefghijklmnopqrstuvwxyzABCDEFGHIJKLMNOPQRSTUVWXYZ0123456789"

export const POST: APIRoute = async ({ request, locals }) => {
  try {
    const body = await request.json()
    const url = new URL(body.url)
    let hashed = Number.parseInt(md5.hex(url.href), 16)
    let slug = ""
    for (let i = 0; i < 6; i++) {
      slug += charset[hashed % charset.length]
      hashed = Math.floor(hashed / charset.length)
    }
    const { SHORT_TO_URL } = locals.runtime.env
    await SHORT_TO_URL.put(slug, url.href)
    return new Response(JSON.stringify({ slug }))
  }
  catch (e) {
    return new Response(JSON.stringify({ error: "Invalid URL" }), { status: 400 })
  }
}
src/pages/[slug].ts
這個endpoint需要處理得到的slug並查詢先前儲存的URL並提供轉址
import type { APIRoute } from "astro"

export const GET: APIRoute = async ({ params, locals, redirect }) => {
  const slug: string = params.slug ?? ""
  const { SHORT_TO_URL } = locals.runtime.env
  const url = await SHORT_TO_URL.get(slug)
  if (!url) {
    return new Response(JSON.stringify({ error: "Not found" }), { status: 404 })
  }
  return redirect(url, 301)
}
部署
我們可以在package.json設定build並deploy的指令
{
  "scripts": {
    // ...
    "deploy": "astro build && wrangler pages deploy",
  }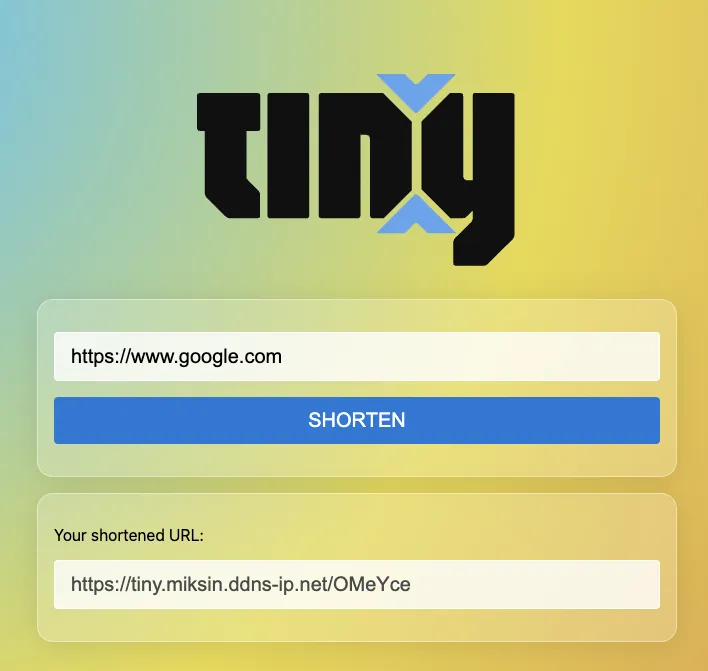
}npm run deploy成功!不過我的domain name太長了,根本沒縮短🙃
疑問
我原本是設定在Cloudflare Pages附帶的deploy功能,但只用這個功能不會自動幫我產生worker。 也就是說除了static的頁面以外都沒有部署成功(會顯示404)
似乎只能用wrangler pages deploy從local來部署才行