国際化とサイドバー
AI生成の要約
この記事では、VitePressで国際化サポートを設定し、サイドバーを自動生成する方法を紹介します。まず、多言語フォルダとファイルを設定し、次に config.mts で言語オプションを設定します。次に、vitepress-sidebar プラグインをインストールして設定し、CSSを修正してサブアイテムのインデントを実現します。
国際化設定
フォルダとファイルの設定
設定については公式ドキュメントを参照してください。私は3つの言語を設定しました:
- 繁体字中国語(ルート)
- 英語
- 日本語
docs/
├─ en/
│  ├─ foo.md
├─ jp/
│  ├─ foo.md
├─ foo.md
configの設定
docs/.vitepress/config.mts に設定を追加します。
typescript
export default defineConfig({
  // ...
  locales: {
    root: {
      lang: "zh-TW",
      label: "繁體中文",
      themeConfig: {
        nav: [
          { text: "Home", link: "/" },
          { text: "Notes", link: "/notes/vitepress", activeMatch: "^/notes" },
        ],
      },
    },
    en: {
      lang: "en-US",
      label: "English",
      themeConfig: {
        nav: [
          { text: "Home", link: "/en" },
          { text: "Notes", link: "/en/notes/vitepress", activeMatch: "^/en/notes" },
        ],
      },
    },
    jp: {
      lang: "ja-JP",
      label: "日本語",
      themeConfig: {
        nav: [
          { text: "Home", link: "/jp" },
          { text: "Notes", link: "/jp/notes/vitepress", activeMatch: "^/jp/notes" },
        ],
      },
    },
  },
  // ...
})
サイドバー設定
サイドバーのパスを公式ドキュメントのように手動で設定することもできますが、ファイルを追加または変更するたびに手動で同期するのは現実的ではありません。そのため、自動生成することにしました。
VitePress Sidebarのインストール
bash
npm i -D vitepress-sidebarconfigの設定
docs/.vitepress/config.mtsに設定を追加します。
typescript
import type { DefaultTheme, UserConfig } from "vitepress"
import { defineConfig } from "vitepress"
import { withSidebar } from "vitepress-sidebar"

const vitePressConfigs = {
  title: "miksinote",
  // ...
} satisfies UserConfig<DefaultTheme.Config>

export default defineConfig(withSidebar(vitePressConfigs, [{
  documentRootPath: "/docs",
  scanStartPath: "notes",
  resolvePath: "/notes/",
  useTitleFromFileHeading: true,
  useFolderLinkFromIndexFile: true,
  useFolderTitleFromIndexFile: true,
}, {
  documentRootPath: "/docs",
  scanStartPath: "/en/notes",
  resolvePath: "/en/notes/",
  basePath: "/",
  useTitleFromFileHeading: true,
  useFolderLinkFromIndexFile: true,
  useFolderTitleFromIndexFile: true,
}, {
  documentRootPath: "/docs",
  scanStartPath: "/jp/notes",
  resolvePath: "/jp/notes/",
  basePath: "/",
  useTitleFromFileHeading: true,
  useFolderLinkFromIndexFile: true,
  useFolderTitleFromIndexFile: true,
}]))
withSidebar を使用して、3つの言語それぞれに設定を行いました。resolvePath と basePath は非常に重要です。試行錯誤の結果、正しく動作する設定を見つけました。
開発サーバーを再起動すると、サイドバーが正しく表示されます!
bash
npm run docs:dev言語を切り替えて、正しく動作するか確認してください。
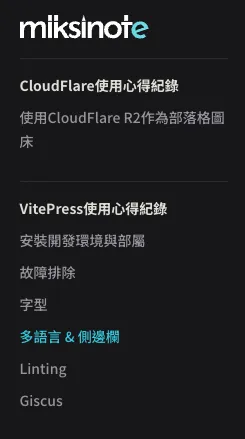
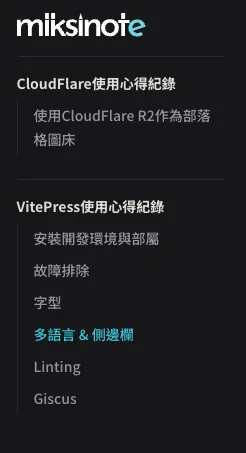
CSSの設定
サイドバーは表示されますが、メインアイテムとサブアイテムが同じレベルにあります。サブアイテムをインデントしたい場合は、画像のようにします:
幸い、公式ドキュメントには修正方法が記載されています。
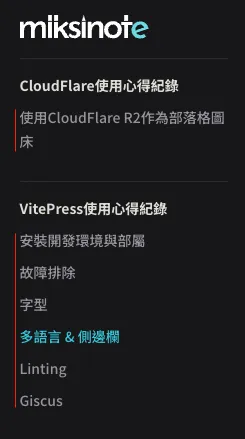
docs/.vitepress/theme/style.css に設定を追加します。
css
/**
 * Component: Sidebar
 * -------------------------------------------------------------------------- */
.group .VPSidebarItem.level-0 .items {
  padding-left: 16px !important;
  border-left: 1px solid var(--vp-c-divider);
  border-radius: 2px;
  transition: background-color 0.25s;
}
正しいインデントが確認できます。